This software is provided "as is" without any explicit or implied warranties.
I accept no responsibility for any harm, loss, damage or any other change to the universe as a whole
or any part of it, be it in your possession or otherwise, that may occur while having any sort
of access to this software. This software is free. You get what you pay for. Use at your own risk.
Feel free to redistribute, but at no charge beyond covering physical media (if any), and without
requiring user subscription.
Contents
General description
Requirements
Usage and configuration
The gamma helper
Tested games
Known issues
Technical status
New in this release
Where to download
Contact
Acknowledgments
Legal beagle
Glossary
This is a Glide wrapper, ie a library that emulates the programming interface for 3dfx Voodoo
hardware and in turn allows games specifically coded for it to run on other vendors' graphics
cards. Specifically, this wrapper emulates the Glide 2.4 API and a beefed up Voodoo I card. It uses
OpenGL to do so.
There's also some preliminary support for the Glide 3 API, but this isn't going very
far. The Glide 3 emulation currently supports Diablo 2 quite well, but little else.
You don't use Glide directly. Games use Glide, but only if they are designed to do so. Nowadays, none are. Only
old games from times where Voodoo cards ruled PC gaming support Glide.
1)Hardware
The wrapper requires an MMX capable processor from your preferred vendor (read: anything sold in
the last hundred years or so). SSE and 3DNow! are supported, but not required.
The number of correctly emulated effects will depend on your graphics card. Depending on the feature set of the card,
the wrapper can work in three different modes with different emulation fidelity. Let's call them "tiers". Here's a little
table that shows which graphics chips qualify for which tier:
|
Geforce
Geforce 2
Geforce 4MX |
Geforce 3
Geforce 4Ti
Wildcat VP |
Geforce FX
Geforce PCX
Geforce 6xxx |
Radeon
Radeon VE
Radeon 7xxx |
Radeon 8500
Radeon 9000
Radeon 9100
Radeon 9200 |
Radeon 9500 or higher
Radeon X300 or higher |
Volari V5
Volari V8 |
DeltaChrome
OmniChrome |
GMA900
(Intel integrated) |
| Tier 0 |
Yes | Yes | Yes | Yes | No*** | Yes | - | - | - |
| Tier 1 |
- | Yes | Yes | - | Yes | Yes | - | - | - |
| Tier 2 |
- | - | Yes | - | - | Yes | Not yet* | Not yet* | Maybe** |
*Theretically yes, but not with the current drivers. Expect severe rendering errors and crashes
**Untested
***Tier 0 operation is disabled for these cards due to backward compatibility issues in the drivers
- Tier 0
This is the bare minimum. Results could be ugly because chroma keying will not work reliably and
some other things can only be approximated.
- Tier 1
This is first generation pixel shading hardware. Chroma keying is fully supported but there are still a few approximations going on.
- Tier 2
These are cards that support the ARB_fragment_program extension (maybe better known as "DX9 pixel shaders 2.0"). This will
eliminate all combiner approximations and offer the most feature complete emulation available.
Graphics chips that aren't listed in the above table aren't supported. They won't work with the wrapper at all. Sorry.
I recommend at least an ATI Radeon 9200 (w/o "SE" suffix!) or NVIDIA Geforce3 based graphics card for nice emulation
quality and performance. But note that if you intend to use the wrapper's high resolution mode, these cards may not be fast enough
anymore. Also, please keep in mind that a Geforce4MX is actually worse than a Geforce 3.
Any processor from 1GHz onward should suffice for virtually every Glide game ever made, perhaps with the exception of Ultima IX.
A "dream system" would consist of an AMD Athlon XP2500+, 512MiB of memory and a Geforce FX5900. GeforceFX cards have a slight edge
over ATI cards and even Geforce6 series cards, because they support paletted textures in hardware, and that's very useful for Glide
emulation. NVIDIA cards also have the upper hand in readback performance.
2)Software
Windows 98, Me, 2000 or XP.
Please make sure you have installed a current driver for your graphics card.
Head here for Radeon cards, and
here for Geforce cards.
In particular, if you're using a Radeon 9500 (or better) card, you really should be using Catalyst 4.1
or a more recent driver. Older drivers had issues with fog, smooth lines, and would even reproducibly hang
in a few circumstances (like some particular shader that's generated when Wing Commander prophecy wants to enter
flight). If you're using Win9x, which isn't such a bad idea for "retro" gaming, rest assured that Catalyst 4.3
has been tested extensively with the wrapper and works very well.
Speaking of drivers, some choices the wrapper will make will also be influenced by your graphics card driver
settings for OpenGL:
- For the Glide wrapper's own vsync control to work, allow vsync application control in your OpenGL settings. On
ATI cards, this would be "default on" or "default off", on NVIDIA cards it's "application controlled". You should avoid the
"always on" and "always off" vsync settings in your OpenGL driver controls.
- If you set anisotropic filtering to anything else but "application controlled" in your OpenGL driver settings, the
wrapper won't be able to control anisotropy.
If you never touched these driver settings, or don't even know where they are, everything should be fine. Default driver
installations have the correct settings.
If you want to make sure, the basic approach to these settings is right-clicking on the desktop, selecting "Properties" from
the menu that pops up, then open the "Settings" tab, then click on the "Advanced" button in the lower right corner. From here on
it's different for ATI and NVIDIA users.
ATI users with the "classic" control panel should now open the "3D" tab and select the "OpenGL" radio button. The current OpenGL
settings will now be displayed. To change them, check the "user defined settings" checkbox and hit the button right below it.
A faster way to get into the 3D tab is to right-click the little ATI icon in the systray (if it's there), select "Settings", then
"ATI display settings".
If you use the "Catalyst Control Center", there won't be a choice between "OpenGL" and "Direct3D". The options will simply apply
to both OpenGL and Direct3D simultaneously.
NVIDIA users should open the tab that has the little NVIDIA logo and the name of their graphics card on it. From the side menu,
select the "Performance and Quality" entry, and the relevant options will show up in a listbox near the bottom of the dialog.
There won't be a distinction between OpenGL and Direct3D in this dialog. The options apply to both of these APIs.
As you're reading this, you should have already run the wrapper installation, so you're basically good to go.
A lot of Glide games should be running just fine with the default settings. For a list of tested games,
see below. You should, however, fire up the configurator at least once and set a
"resolution limit".
The configurator can do a lot more, though. You'll be able to configure global settings and application specific
overrides for games you've run at least once (or I've run at least once; I've supplied a premade config that
already "knows" a few titles).
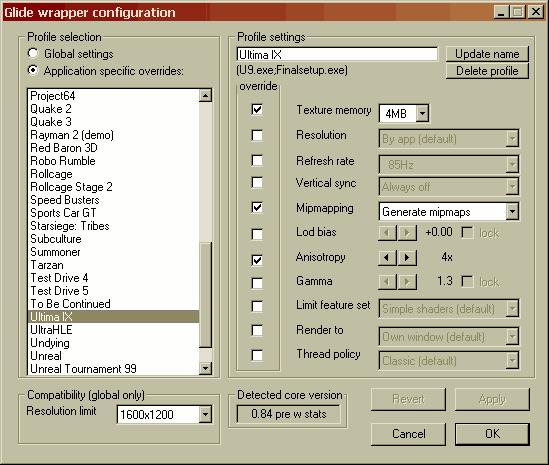
Works as follows:
Settings are organized into profiles. There's one profile for every game and additionally a global profile.
The global profile will store your choice for every individual setting. It's the fallback plan for "unknown" games
(i.e. games that don't have their own profile yet) and for incomplete per-game profiles. Yep, a game profile can be
incomplete. It can contain just a few settings or none at all. The missing settings will "shine through" from
the global profile.
The correct game profile, if it exists, will automatically kick in when a Glide game starts. You don't need to
"activate" it before launching the game.
If you start a Glide game that has no profile yet, it will also run using purely the global configuration, and
a new empty profile will be created for it, which you can then edit. These profiles will initially be named
after the game executable ("something.exe").
You can select a profile for viewing/editing in the configurator's top left corner, using the radio buttons
and the profile list. If you selected "Global", you're free to modify everything (we'll get to a description
of the individual settings in a bit).
If you select a game profile on the other hand, most of the settings will initially be greyed out and can't be
changed. This is the case for settings where the global configuration "shines through" because there's no override. You
can modify a setting here only if you check the "override" check box to its left. Changes made to these per-profile
settings will replace the setting from the global profile for the currently selected game only -- that's why they're called overrides.
Later changes to the same setting in the global profile will not affect the selected game as long as the override is in place.
An override can be deleted from a game profile by simply unchecking the check box.
If a game profile is currently selected, you may edit its name. Make your changes in the text box in the upper right, then hit
"Update name".
To make life a little easier the configurator is "WYSIWYG" at all times. The settings that
actually will be used for a game can be a mix of global settings and profile specific overrides. The good news
is that you don't have to switch back and forth between the global profile and the game profile to figure out what this
mix is. The configurator will display the effective compound settings for the game you have currently selected.
Whew. It really is much harder to explain than it is to use. Play around with it some and hopefully you'll agree.
But of course you still need to know what the settings do:
Texture memory - safe: 2MB - fastest: 16MB - nicest: 16MB
This setting specfies how much texture memory your emulated Voodoo I card will have, and in turn report
to the running application. You can select 2MB, 4MB, 8MB or 16MB. Generally more is better, but there are two
possible reasons to go with less. First, some games use, um, interesting texture management schemes that do not
work well with the wrapper, and the OpenGL driver behind it. These tend to run smoother with less texture memory.
Definitely true for Starsiege: Tribes and King's Quest 8.
Second, games that were not designed to handle large amounts of texture memory may simply crash. There have never been
real Voodoo I boards with more than 4MB of texture memory, so this kind of "bug" was impossible to detect in that era.
Resolution - safe: default (by app) - fastest: default (by app) - nicest: try high res
Should you manage to destroy your monitor by using the high res option, please refer back to the
disclaimer of warranty.
"Default (by app)" will give you the screen resolution the game wants. Most Glide games are limited to a single resolution,
640x480 most of the time. This may be too little for your tastes, so you can bump that up by selecting "try high res". This
will give you a quadrupled screen resolution, along with the appropriate performance hit, of course. 512x384 will become 1024x768,
640x480 will become 1280x960 and so forth.
When the Glide wrapper can't switch to the high resolution, either because the system denies it or because of exceeding the resolution limit, it will automatically fall back to the default resolution. The idea behind this double-checking
is extra safety. You might have "tweaked" your system to enable all resolutions your graphics card can generate, despite of your
monitor not being able to handle them. If you did a tweak of this kind, the system check will no longer work, and won't protect
you from damaging your monitor.
Refresh rate - safe: default (by app) - fastest: n/a - nicest: 85Hz or more
This lets you control actual monitor refresh rates. Glide games can set their preferred refresh rates themselves,
and you can have the glide wrapper try that by selecting "default (by app)" here. In case of a game selecting an eye
straining 60Hz, you can pick something else. Most people are comfortable with 85Hz and won't notice any flickering at or above
that rate.
The wrapper cannot guarantee you'll get the exact refresh rate you selected, but it will try to approximate your selection as
closely as possible. On most Win9x systems and on Win2k/WinXP systems that have been treated with a "refresh fix" of some sort,
the graphics driver will only support one refresh rate, so that's probably the culprit if this option doesn't work for you.
If you really "don't care", that's an option, too. It'll give you a "system default" refresh rate, which probably means
60Hz, regardless of what the game wants.
Vertical sync - safe: by app, pedantic - fastest: always off - nicest: by app (default)
This is the popular vsync option, also seen in your regular graphics card control panels. Vsync's purpose is to avoid
tearing but it can also be abused to function as a frame rate limiter.
"By app (default)" lets the application control vsync itself. I.e. the game may choose itself wether to use it or not.
If it does, this option will sync to the actual monitor refresh, which may be different from what the game expects.
That can be a problem. Some games rely on refresh synchronisation for their game timing (like Gex3D and Rayman 2), and things
will go wrong if they run at an unexpected refresh rate (... which is sort of guaranteed on Win9x, and otherwise may happen if
you selected a refresh rate yourself). "By app, pedantic" remedies this problem by not waiting for the actual monitor
refresh, but instead waiting for another, simulated refresh cycle that is exactly as fast as the game wants it to be.
This will correct game timing issues, but, because frame times and monitor refresh are now separated, it might reintroduce
tearing. Pedantic vsync isn't really vsync. It's a timing fix.
"Always off" will never wait for a vertical retrace when swapping frames. Fastest choice, may result in
tearing. It will also cause extreme issues with timing challenged games, as named above.
"Frame limiter" is almost the same as "Always off" but will limit frame rates to about 150 fps. This
is useful for games where very high frame rates break animations and/or game physics (such as Outlaws and Unreal), in case
you want more speed than would be possible with true vsync.
"Always on" will synchronize frames to the monitor refresh all the time.
Mipmapping - safe: default - fastest: default - nicest: generate mipmaps
This controls how textures will be filtered, "default" being just that, as closely as possible to the way a real Voodoo card would
do it.
Up one notch on the quality scale, and we get to "force trilinear", which eliminates visible mipmap transitions. Trilinear
requires mipmapped textures to have any effect, and not all games supply textures in this form ...
... and that's what "generate mipmaps" is for. It will create complete mipmap sets for all textures, and force a trilinear
filter on them. This will reliably smooth out all textures, but note that it is quite far from the behaviour of the original
hardware.
Lod bias - safe: 0.0 - fastest: +3 - nicest: n/a
The lod bias modifies the mipmap selection (which is a part of texture filtering) for every textured surface. Values greater
than zero will blur textures, values less than zero will make textures sharper but also cause shimmering.
Glide games can change the lod bias. If you choose to lock the lod bias, this application control will be ignored.
If you don't, your chosen lod bias will be added on top of the game's own setting.
Unreal 1 is one of the games that use a negative lod bias extensively, which can look rather
ugly in motion. If this kind of thing disturbs you, you can lock the lod bias at 0.0 and instead increase texture quality
via anisotropic filtering.
Anisotropy - safe: none - fastest: none - nicest: lots of it
This is another texture filtering control, and you probably also have one of these in you graphics card driver's own
settings. Anisotropic filtering, in a nutshell, will increase texture sharpness on surfaces at steeper angles "into" the screen.
The wrapper will take care not to "beautify" textures that are used for special effects (chroma keying again ...), to avoid the
artifacts that this would cause.
Note that "16x" is always available as an option, due to my laziness. NVIDIA chips before the Geforce 6 series
only support a maximum of "8x", you can't and won't get more than that on these cards. The limit is even lower on Geforce 2 and
Geforce 4MX -- "2x" AFAIK.
Gamma - safe: 1.3 - fastest: n/a - nicest: n/a
This lets you specify the initial gamma value for Glide games. If you don't know what gamma means: think "brightness".
Later games like a value of 1.3, which is the default of the last real Voodoo drivers. Games from the Voodoo I era
sometimes look better with a value of 1.7 (eg Test Drive 4 is much too dark otherwise). As Glide offers application
control of gamma settings, a game may override your selection (eg Unreal does), unless you "lock" gamma.
With this option, all application gamma settings are discarded, and gamma stays at what you've chosen here.
Limit feature set - safe: simple shaders - fastest: simple shaders - nicest: most fancy shaders
This will let you set an upper limit to the graphics feature set used by the wrapper for rendering. E.g. you can
force a card that qualifies for tier2 operation to work as a tier0 card, if you want to. The meaning of these tiers
and the required cards are listed in the Requirements section.
"Don't work at all" will cause the wrapper to report all sorts of initialization failure to a game that requests
Glide rendering. This behaves much like real Voodoo drivers that were left installed on a system where the actual
Voodoo hardware has been removed. This is intended for games that support mutliple rendering APIs but automatically pick Glide if it's
detected, even though you don't want to use the Glide renderer. Like Powerslide (which now works well, but didn't, in earlier
releases).
"Basic stuff only" will limit you to "tier 0" functionality. The most obvious effect is that you'll lose proper
chroma keying emulation, even if your card could do it. Might be interesting to people with higher spec cards
who want to see what Gf4MX owners have to suffer.
"Simple shaders" will enable "tier 1", i.e. full chroma keying support and slightly higher quality if your graphics card qualifies.
"Most fancy shaders" will enable up to "tier2". No approximations, the best emulation quality and all effects this wrapper can provide.
The choice between "simple shaders" and "most fancy shaders" is primarily intended for Geforce FX owners where in very high
resolutions "most fancy shaders" can cut performance in half, or worse, without any tangible quality gains, and OTOH "most
fancy shaders" often ends up being faster in low resolutions.
Each tier requires a specific feature set be supported by the card, so you can't force a higher tier on a grahics card that
doesn't qualify. But the wrapper won't stop working because of a "too high" selection here, it will simply fall back to the next best thing
if your selection doesn't work.
In the case of the supported XGI and S3 chips, it may also fall forward, so to speak, because there are no tier0 or tier1 paths for
these. If you have one of these cards, you'll get the tier2 mode unless you pick "Don't work at all". The other choices
will have absolutely no effect.
You can safely leave this on "simple shaders", in case you couldn't make sense of all this babbling.
Render to ... - safe: own window - fastest: n/a - nicest: n/a
Warnings first: Never, never, never touch this option unless you really need to. You'll know that you need to,
if your game is missing textures and is flickering badly all the time. Or on NVIDIA cards, if the game graphics
seem to smear around the screen, leaving traces on their way.
The default is "own window", because just like any normal, well behaved program, the wrapper will then open up its own
window to display graphics, and leave the application's window alone. If selected, render to "client window" will
instead 'hijack' the window the game created, and draw stuff into it. This is unclean and prone to errors, and yes, it may
cause crashes while playing, or when exiting the game. Not recommended for general use, much less as
a global setting. You have been warned.
This option is only necessary because a few select games (Need for Speed, Tarzan, any others?) are very, very confused
about window handling and interfere with the wrapper's graphics window. Genuine Voodoo cards don't mind, because they
don't need to care about windows. They can physically disable anything not generated by themselves.
Please be aware that if you're setting this to "client window", you're fighting evil - with a greater evil.
*cue Psycho theme*
Thread policy - safe: Classic - fastest: Classic - nicest: n/a
Ah, the joys of multithreading on Windows. This setting controls whether or not the wrapper will use dedicated threads for
rendering and/or interaction with the Windows API. The only reason this exists is because it presents possible workarounds
for game crashes.
"Classic" doesn't care about threads. This is the behaviour of older versions of my wrapper.
"Use system thread" uses a dedicated thread to perform dealings with the operating system.
"Use render thread" runs a dedicated rendering thread, that will basically shield the OpenGL driver from multithreaded
rendering code.
"Crazy" combines the above two. It will run both a dedicated system thread and a dedicated rendering thread.
"One thread for both" runs one extra thread that deals with the OS and with OpenGL.
"Classic" is the recommended setting unless noted otherwise in the game list. For most games this is okay,
and it avoids the threading overhead. If you have a "HyperThreading" enabled Pentium 4, you might get a very small
performance boost from "use render thread". But on regular single-processor machines, it makes games that fiddle
with thread priorities extensively (Dethkarz ...) run slow and choppy, and has no other benefits.
The other three options are a kind of "special game fixes" and should be cautiously, if all else fails. "Crazy" is
required for very few games, but will break many others. "One thread for both" is very similar in behaviour
but not quite as drastic, so it might be more stable in some games. I have so far not found any use for the "Use system thread"
option. Doesn't seem to do much good alone.
Even though at least two of these are redundant to me personally, I've left them in as options. Maybe some of you have games that
can only be fixed this way.
I really recommend leaving the global thread policy at "classic".
There's another option in a little box at the lower left. It wouldn't make much sense to have it per profile, so this one's
global only:
Resolution limit - safe: depends, please read on
Set it to something your monitor definitely can handle. Most likely 1280x1024 for your regular 17 inch CRT.
Even below this configurable limit, the wrapper will, of course, only use resolutions that the system thinks it can
support. The whole point to this option is that the system may be wrong, or it may have been configured to not care.
So this can and should be used as a safety measure if you "unlocked" screen resolutions that go beyond your
monitor's capabilites, or if you have an older monitor that has no way of telling the system back what it can do. Recall
that the "try high res" option can turn a harmless 800x600 into a potentially lethal (to your poor display
device) 1600x1200. The Glide wrapper will never switch to any resolution that's higher than what you select here.
And last, but not least, the buttons:
- OK
Saves all changes you've made and closes the configuration app.
- Cancel
Discards all changes and closes.
- Apply
Saves changes, but keeps the configuration window open.
- Revert
Undoes any changes you made since last saving. Ie, if you change stuff, press Apply, change more stuff, and then press
Revert, only the changes made after pressing Apply will be undone.
You may wonder what this is good for. It's a small utility that lets you set your desktop gamma. This is useful for
instances where a Glide game has crashed, and you're left with a desktop that's too bright. Though I've tried to
prevent this from happening, it still does happen on certain cards and driver versions. For NVIDIA users in particular
this can get pretty annoying, as the driver control panel doesn't seem to recognize that gamma settings are way off.
The "restore defaults" button just won't take you back to your usual brightness levels. The gamma helper will, umm, help, and do
so quickly.
If you need a desktop gamma of 1.0, you can just launch the gamma helper, hit ENTER and you're back to normal. You can
set other gamma levels too, if you wish. The whole thing should be pretty self-explanatory.
If you're unsure whether you need this, chances are that you don't.
The following list almost exclusively contains titles I've tested myself. I made it a policy to not include
titles in the "fine" category if they were reported to work, but I couldn't verify that. I do that because the wrapper now
has six different "code paths" for the different supported graphics cards, and just because a game happens to work on one
of them doesn't mean it will work on all of them. So I'd rather do extensive testing first. Sorry if this seems arrogant,
I'm just trying to be thorough here.
Stuff that works
- fine (aka pixel perfect)
- Boss Rally
- Carmageddon 2
- Carnivores, demo version 1
- Croc, full version 1
If you change Croc's "driver settings", make sure to delete the glide2x.dll that gets created in the game directory.
- Descent: Freespace, full version
Thread policy: Crazy
- Dethkarz 1
- Diablo 2
Minor issues of Geforce 1/2/4MX: minion portraits are not transparent and stackable minion counts (wolves, ravens) will not be displayed.
Unlike on real Voodoo hardware, the game will react to the "Windows key", which can get pretty annoying. I wasn't able
to prevent this. Sorry. Otherwise works very well.
- Die By The Sword, full version and addons 1
The game will not display its hardware selection menu (and thus run in software mode only) unless you either use Windows 98
compatibility mode or launch the game by double-clicking Windie.exe in the game folder.
Doesn't shut down cleanly. You need to kill the process after exiting the game.
- Driver, demo version
- Gex 3D, demo version 1 3
- Heli Heroes
- Ignition 1
The game uses the 640x400 resolution. That means if you want high res, you need to convince your graphics card driver
to support the quite unusual 1280x800 resolution ...
- Incubation 1
- Independence War Deluxe: Defiance (demo version) 1
I don't have the full game, so that may well behave differently. If you're having problems, please
read this. Note that
reducing the amount of virtual
memory may help to prevent some crashes. As seen here for example.
- Killer Loop, demo version
- Manx TT Superbike, demo version
- MDK
- Motorhead, demo version
Full version crashes!
- Need for Speed 2, full version 2
Thread policy: Use render thread. Note that the demo version is listed separately in the glitchy section.
- Pandemonium 2, demo version 1
- Powerslide
- Quake2 "3dfxGL", full v320 (AMD build)
Do not select "3DNow! 3dfxGL", that's for Voodoo 2 only ...
- Quake3 with WickedGL 2.99
- Rollcage: Stage 2, demo version 1 4
- Speed Busters
Thread policy: Crazy
Transparency problems on tier0 can be fixed by selecting 8 bit textures in the game's launcher.
- Subculture
If the game starts up windowed and without focus, click it once (in the taskbar) or use ALT+TAB to activate it.
- Summoner
- Starsiege Tribes, demo version
Runs best with texture memory set to 2MB. Still pointless. Just use the built-in OpenGL renderer.
- Tarzan, demo version 2
- Test Drive 4
Gamma at 1.7 is recommended.
- Turok - Dinosaur Hunter
- Ultima IX, full v1.09
Transparency issues of Geforce 1/2/4MX.
There's some z fighting, but this happens on a real Voodoo 3, too, depending on view distance settings. Performs okay now, but
the Direct3D renderer is still much faster. Ironically, the game seems to run smoother if you have the wrapper generate mipmaps.
- Ultim@te Race Pro, demo version 4
- Unreal, full v226
The game's timing starts to break with very high frame rates (200+ fps), so leave on vsync or use the frame limiter option. The game is also
very incompatible with "Cool'n'Quiet" and "SpeedStep" power saving tech.
Radeon 8500 has numeric range issues with certain floor textures. Radeon 9000 and 9200 (which
are treated in the exact same way by the wrapper) are fine. This is out of my control.
- Unreal Tournament, full v436
- Wing Commander Prophecy, demo version 1 5 (>512MiB)
The videos will play too fast, the game is fine. I was told that's not my fault :-)
Reducing sound hardware acceleration to "none" in DXDiag (Start->Run->dxdiag) is supposed to help. It didn't help me, but give
it a try.
- Wizardry 8
- with rendering glitches or other issues
- ePSXe w Lewpy's Glide Plugin
Looks very well, performs like dog on Radeons. Geforce cards should be okay.
- F1 (Psygnosis), demo version
Occasional flickering on the track, right in front of the camera. You must rename (or delete) the glide2x.dll that comes
with the demo.
- F15 (Jane's) - reported, not tested by myself
Reported to work okay, but with horrible performance issues in the cockpit view. Stay away from the high res option, because
it will cost a lot of performance in this game.
- Madtrax, demo version 1
Transparency issues on NVIDIA cards. Fine on ATI cards.
- Mask of Eternity (aka King's Quest 8), full version 5 (>512MiB)
Looks good, and now constantly hits its internal 15 fps limit if you limit texture memory to 2MB.
- Need for Speed 2, demo version 2
Unlike the full version, this one works better with the Thread policy set to Classic. Lots of sound issues.
- Operation Flashpoint, demo version
Mild texture and shadow issues. I recommend just using the Direct3D renderer. It offers better performance, allows a wider
selection of screen resolution, and looks great.
- Outlaws
Opening doors and some other scripted animations do not work properly with very high framerates. Avoid the "Always off" vsync option.
The menu background is all pink and save game screenshots will be all grey. This is a known regression and will be fixed.
- Project 64 w Gonetz' Glide64 plugin
Thread policy: Use render thread.
There will be no multitexturing effects because the wrapper currently doesn't support multitexturing. HWFBE won't work either.
- Rayman 2, demo version 1 3 4
Needs a few seconds to start up, be patient. Resolution switching through the in-game menu doesn't work.
- Red Baron 3D, multi-player demo
The cockpit misses a few pixels and the mouse cursor is garbled, otherwise okay.
- Robo Rumble 3D, demo version
If mouse clicks don't register, ALT+TAB away from the game, then ALT+TAB back to it. The mouse should now work.
- Rollcage, demo version 1 4
The flag in the top right of the menu screen isn't quite right.
- Sports Car GT 1
Intro slides don't show up, mouse trail in menus, some color interpolation issues in the game.
- UltraHLE
Multitexture effects are missing.
- unplayable
- Hind
Instant crash.
- Joint Strike Fighter, demo version
The hud doesn't render, very slow
- Long Bow 2
Instantly crashes for me. Some people reported success with various versions of my wrapper (you can still get a few older ones from the
download site). Others reported crashes only after playing a while. So ... try it. It does not work for me at all, and I won't
promise anything.
- Montezuma's Return
Black. Everything.
- Monaco Grand Prix Racing Simulation
Sooner or later it will crash. Thread policy Crazy seems to be best, but that's not saying much.
- POD
Thread policy: Use render thread.
Rendering works, but in-game keyboard controls are "late".
- Rogue Squadron, demo version
Keyboard issues. Can't create a player profile ...
- Uprising, demo version
You'll only see the hud, nothing else (the game uses a "compare to bias" depth testing mode)
Notes:
1 requires tier 1 hardware to look good.
2 use "render to client window" option
3 likely much too fast, try the "pedantic" vsync option
4 does not run properly on Win2k/WinXP. Win98SE is recommended. Or give it
a shot with compatibility mode
5 incompatible with systems that have large amounts of memory
There are some species of games I'm well aware of that do not run through this wrapper more or less "by design".
- Games for DOS Glide. The wrapper requires OpenGL which is simply not available in any DOS environment.
You should try GLIDOS, which redirects DOS Glide to Windows Glide, and can also work with Glide
wrappers. GLIDOS comes packaged with a different Glide wrapper and it may be safer to
just use that.
dgVoodoo is another option for DOS Glide (and Windows based Glide games, too), and well worth
a shot.
- Games for the first version of Glide, that need a glide.dll (not glide2x.dll or glide3x.dll). Like Pandemonium 1. I didn't yet
get around to do this, but dgVoodoo already has some support for it.
- Games that inspect PCI devices to detect Glide support. A certain publishing behemoth with a two-letter name has shipped such
games in the past. Instead of using the well defined mechanism for detection that's built into the Glide API itself, they
get right at the PCI bus and look for hardware devices. This is an incredibly boneheaded thing to do and there's no way I
can work around it.
- Final Fantasy VII :-)
The retail version is not even using Glide, that must be a false rumor or something. As I've received requests to support it,
I thought I'll mention it here anyway. True, out of the box, FF7 runs best on Voodoo cards (and S3 Savage and Matrox chips,
I was told). But its API of choice is in fact Direct3D. If you can't get it to run hardware accelerated, you need the "Riva
TNT patch" for the game - even if you're using an ATI card.
Some people may be interested in this information, and besides, I am always interested in bragging :-)
Feel free to skip ahead.
- ~835k C/C++ source code plus ~170k assembly source code
- full fledged state machine design, not just a "wrapper"
- Passes all tests from the Glide2 SDK (I'm counting 34)
- Full texture memory simulation. No tricks. Whatever bogus a game may decide to write to texture memory, this will
work exactly like 'the real thing'. Writing multiple textures at once and other nasty stuff.
- High performance paletted texture/ncc texture emulation.
- uses pixel shading hardware for texture/color/alpha combiners, chroma keying, "aitrgb"
- per-pixel chroma keying emulation (carefully mapped to the alpha test)
- correctly handles malformed vertices handed by MiniGL drivers
- Pretty decent and lazy LFB lock/unlock emulation, using a "magic number" clear scheme, texture tiles and a minimum writeback strategy
- Pure MMX assembly pixel/texture format converters, filters, (de)swizzle, (de)mux, block copies, block campares, etc
- complete w buffering emulation for both geometric primitives and pixel transfers. My Voodoo 3 agrees most of the time
(thanks to Daniel for pointing this out ...)
- Vertex processing is optimized for 3DNow! and SSE instruction set extensions. The most expensive vertex converter, including
fog table lookup, takes 70 cycles on Athlon XPs.
- two-pass MMX/SSE/3DNow! supported convex polygon clipper for arbitrary vertex layouts. ~200
clock cycles for an average clipped triangle
- anti-aliased lines
- gamma correction
- destination alpha and separate blending modes for rgb/alpha
- multibase textures (dirty hack, but it works ...)
- all Glide3 vertex parameters ("window" coordinate space only)
- gu 3df file loading (including palettes/ncc tables)
- supports all Glide2 fog modes on all targets
- supports TEXMIRROR, FOGALPHA and FOGCOORD extensions to Glide3
Not working
- Swap chain control (triple buffering vs double buffering - AFAIK this cannot be done in OpenGL)
- depth buffer "compare to bias" modes
- still more LFB stuff (pure depth buffer locks, mixed color/depth read locks)
- "prefog color" blend source
- "clip" coordinate space (Glide 3 only)
- "chroma range" (Glide 3 only)
- anti-aliased points, triangles and polygons
Changes: version 0.84c posted Jun-19-2005 vs version 0.84b posted Jun-03-2005
- bugfixes:
- the Glide 3 FOGCOORD extension now works properly on the R200 tier1 path (previously there was no fog in Glide64)
- fix (rare, corner case) chroma keying glitches on the tier2 path (regression; introduced with the tier0 chroma stuff in 0.84b)
- work around a vertex program compiler issue in DeltaChrome drivers. This fixes the instant crash on startup. These cards still
don't work well with this wrapper, though.
- allow running the r200 tier1 path on S3 DeltaChrome. It supports the required extensions with recent drivers.
- multi-user support workaround: store successfully expanded %appdata% values in HKCU portion of the registry. If the
system later fails to expand the %appdata% string, this previous expansion will be used instead. This fixes configuration issues with
"game launchers" that don't pass environment strings to their child process (e.g. Carmageddon 2).
Changes: version 0.84b posted Jun-03-2005 vs version 0.84 posted May-19-2005
- bugfixes:
- thrown out some debugging hacks for Motorhead that accidentally made it into the 0.84 release
- fixed small resource leak in ARB_fp path (two shaders lost on close/reopen)
- fixed a depth test state issue (affected Glide64 with Quake and F-Zero X; regression)
- fixed discoloration of RGB332 textures
- added limited chroma keying support in both tier0 paths (R100 and NV10). This will only work with paletted textures.
- improved message pump behaviour for "Use render thread" and "One thread for both" thread policies. This resolves the
stuttering in Need For Speed 2SE.
- added a secondary method to close the rendering window if DestroyWindow fails (Win32 design flaw). This fixes the
issues with the fullscreen toggle in Project64/Glide64.
- added support for pure depth buffer writes (fix for an unreleased Glide64 version)
- now use depth textures for depth buffer writes when in tier2 mode (fixes semi-transparent car interior in Test Drive 4 when
using anti-aliasing)
- implemented palette/ncc look-aside buffers for a small performance boost (e.g. Unreal Engine games)
Changes: version 0.84 posted May-19-2005 vs version 0.82b posted Dec-30-2004
- bugfixes:
- core: recycled textures now always have the correct filter and clamp modes applied (manifested as grainy textures in Ultima IX,
Tribes, and other games with high recycler activity)
- core: the fog table is now preserved and reapplied properly across ALT+TAB (affected Ultima IX)
- core: mulibase textures are now properly mipmapped (fixes texture shimmering in Powerslide)
- core: plugged a memory leak where the list of supported display modes could be produced multiple times
- core: client alpha usage detection now properly takes additive blending into account (fixes disappearing text in To Be Continued demo
when running a tier 1 path)
- core: clip rectangle state is now resolved in the frontend. This fixes corruption in Driver when using threaded rendering
- core: a number of bugs in tier 2 shader code generation have been fixed thanks to strong syntax checks in GCC :-)
- core: support for streaming stores (MOVNTQ) is properly detected on Athlon (non-XP, non-64) processors again
- Glide3: line strips from contiguous vertex arrays are no longer garbage (SDK Test 31)
- Glide3: no longer use a precedence rule if both "packed rgba" and floating point per-vertex colors are enabled. Instead use whichever
was specified last. This appears to be the way it's supposed to be (as seen in SDK Test 31)
- Glide3: fixed aspect ratio/lod handling during 3df file parsing (crashed several Glide3 SDK tests)
- confer: profile list sorting is no longer case-dependent
- confer: renaming a profile no longer causes unwanted profile switching after making a change
- install: fixed a problem with handling the "don't create Start menu entries" option that previously resulted in a harmless, silent error (might have
caused an event log entry or whatnot)
- lfb subsystem improvements:
- automatically release read locks on buffer swaps. This works around an issue with MDK, where saving multiple times in a single session
would crash the game. MDK never releases its read locks, which is clearly a bug in the game.
- the wrapper can now automatically select and adapt to the current graphics card's preferred readback format. Radeon
cards <=9250 benefit the most; raw readback performance doubles on these cards.
- framebuffer downfiltering (for lfb reads in high res modes) is now done in hardware. This is much faster because
the number of pixels that must travel back over the bus is quartered. Any upside-down flipping will also be handled
at the same time for better bandwidth efficiency on the CPU side.
- the pixel format converter used for readbacks now use prefetching for a further small performance boost
- split the color lfb into separate read and write buffers. This allows still being able to detect which pixels
have been modified by a lock, and which ones were untouched, instead of falling back to the assumption that the whole
buffer might have been modified. This is both faster and nicer, as only modified pixels will be written back and
(in high-res mode) unmodified pixel quads will not be replaced by their downfiltered version.
E.g. in Outlaws, using earlier wrapper versions, toggling on the map overlay would reduce effective color depth from 24 bits to
16 bits; when in high-res mode, you'd also end up with 2x2 supersampling instead of true 2x2 increased resolution.
Not anymore. Full resolution and color quality is maintained.
- pure color buffer clears, when restricted to a small scissor region, will now be handled by the lfb subsystem. This prevents
flushing of write buffers on multiple write locks interrupted by clears. MDK is probably the only game that benefits at all from this.
Its performance index shows a 2.5x speedup from this optimization alone. This qualifies as an app specific driver cheat :-)
- avoid clearing the whole write buffer with the "magic color" and instead clear only modified tiles, if possible. This can save
CPU cycles and memory bandwidth when only small portions of the locked region have been modified (which is quite common
outside of fullscreen video playback).
- Reworked installation for proper multi-user support and full functionality on restricted user accounts on NTFS volumes. Nothing changed for Win9x, but
the following takes effect on Windows 2000 and Windows XP:
- the installer/uninstaller will now complain and exit early when started without admin rights
- the premade config, if installed, now serves as a read-only template. Every user who uses Glide (or uses the confer), including the administrator, will
automatically get a private copy of this first thing in the morning, and will not be able to modify other users' settings
This fixes the following issues seen in previous version on Windows 2000 or XP:
- when installed by an admin, restricted users could not save any configuration changes (RUs can't modify admin-owned files)
- when installed by a restricted user, the premade config could not be used (RUs can't write registry entries in the HKLM tree, so the core DLLs didn't
know where to look for the config)
- when installed by an admin, the uninstaller could be executed by a restricted user but would not work (RUs can't delete admin-owned files)
- when installed by a restricted user, uninstallation wouldn't work at all (install dir is stored in/pulled from HKLM tree where RUs can't write)
On the downside this will leave the private configs on the system after uninstallation (in %userpath%\application data\).
- added code to prevent running the Radeon 7xxx tier 0 path on Radeon models >=8500 and <=9250, due to extreme backward compatibility issues
in current drivers. Bump up to tier 1 instead.
If you've ever wondered what's wrong with "basic stuff only" on these cards, let me just say that it *does not* look like that when
run on real first-generation Radeons. Not even remotely.
- adjusted tier2 chroma keying code. Fixes gaps in Red Baron 3D cockpit, solves Speedbusters issues on Radeon
9500+, corrects cursor outline in Tribes and potentially other similar glitches.
- made Glide3 grGetString more consistent with the real thing
- made NCC table handling consistent with the real thing. Now always use the "packed data" representation of the NCC table
- Updated 3df loader to
generate this stuff
- made the texture object recycler more effective
- added "Always on" vsync option as requested and also threw in the "Frame limiter" option
- added new thread policy "One thread for both"
- added configurator tooltips, capitalized item names as requested, other minor cosmetic changes
- the confer can now detect DLLs with higher search priority (in %windir%\system32) and throw an appropriate warning. This was previously handled
with the popular "The wrapper's glide2x.dll is missing" error and caused lots of confusion.
- added the Delete profile button
Older changelog entries.
My webspace is here. It's generally nice, and best of all, it uses the
same brilliant color scheme as this document. The page dedicated to the Glide wrapper is
this one. New versions will be posted there first.
By the way, if you skipped the previous section, you currently have version 0.84c, posted on Jun-19-2005.
The configurator will also display this information.
Due to my ever capable ISP webmail (which won't let me store mail locally and won't keep it for more than a few weeks),
I've lost a lot of valuable feedback. If you've sent me mail and I didn't reply, I apologize. Try sending it again :-)
But please don't use the old contact address anymore. It's dead. Comments, bug reports, praise and hate mail should go to
ashopa 'at' gmx.de instead.
Thanks to all donors, and thanks to everyone who helped test stuff, reported stuff, suggested stuff. Without your feedback,
this wouldn't work half as well as it does now.
Further mad props go out to (in order of appearance):
Cass Everitt c/o NVIDIA, for giving me
a little shove in the right direction.
Nullsoft, famed creators of Winamp,
for their awesome NSIS (the install system I have the pleasure of using).
The NASM project for their excellent software.
Special thanks to James for being such a good person in general.
Thanks to Mark for the sheer amount of testing he did, and for the "deny service" idea.
Thanks to Tim for being so patient and not giving up. And my apologies for the long time I left him waiting.
Thanks to Daniel for pointing out the flaws in my current w buffering code. Check out his work online here.
Thanks to Humus and Simon F for this ....
All copyrights and trademarks mentioned herein belong to their respective owners. None of them belong to me. If that wasn't clear
to you before reading this, you should be worried.
This wrapper is not based on any 3dfx source code. I've had a
long hard look at the glide SDK documentation and used the glide headers for reference only. These things
have been publicly available for a very long time, and to the best of my knowledge, it's not illegal
for anyone to possess them. All of the code was written by myself, from scratch.
Chroma keying - Compatibility mode - Tearing and vsync
Chroma keying is a transparency technique. For every pixel that is about to be rendered, its texture color is compared
to a "key" color and if there's a match the pixel is discarded. Otherwise rendering will proceed normally. This
is similar to the blue-screen (or green-screen, nowadays) effects used in movies.
The following pictures should illustrate it nicely:
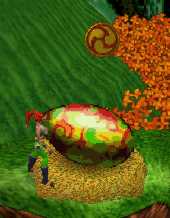
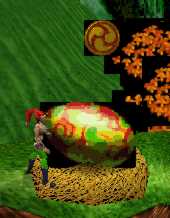
Both are taken from Pandemonium 2. The image on the left has been rendered with proper chroma keying emulation, while for
the right image it has been turned off. Chroma keying, in this case, discards all the black pixels. If chroma keying is not emulated,
the black pixels will remain visible as seen in the right image.
The chroma key is not necessarily black. Glide allows applications to pick an arbitrary color as a chroma key.
Windows 2000 (with a little tweak) and Windows XP (out of the box) allow you to "emulate" behaviour of older Windows versions
for applications that won't run otherwise.
How to unlock this feature on Windows 2000: Service Pack 2 or higher is required.
Click "Start", "Run". Enter "regsrv32 C:\WINNT\apppatch\slayerui.dll" (without the quotes). You can
find further information here.
To use this feature, the first thing you need is a "shortcut" to the program. If you already have one, right click on the shortcut,
select "properties", then open the "Compatibility" tab. Check the box and select the system you want to emulate from the dropdown
list. "Windows 98" is your best bet. Click OK to save the setting and close the properties box. From now on, if you launch the
program through the shortcut, compatibility mode will be in place.
Items in the "Start" menu are shortcuts and can be right-clicked and modified in this fashion. Some game installations
also place shortcuts on the desktop.
If you have no shortcut to the program you want to try in compatibility mode, you can create one yourself: navigate to the folder
where the program is with Explorer. Click and hold down the right mouse button on the executable file, then drag it to the
place where you want to create the shortcut. This can be inside the same folder, on the desktop, or anywhere else. Release the
right mouse button and a menu will pop up. Select "Create shortcut here". Done. You can now launch the program with the new
shortcut, and you can bring up the shortcut's properties to enable compatibility mode. You can later move or copy the shortcut to other
places, including the Start menu.
If you launch the program by double-clicking on the executable itself, you won't get compatibility mode. It will
only work if you launch the program through a shortcut.
Note that you may have multiple shortcuts per program, and each shortcut has its own compatibility mode setting. If you want to
be able to launch a program from multiple shortcuts (say, one in the Start menu and one on the desktop) with the same compatibility
mode setting, you must modify them all.
Tearing is a visual artifact that occurs when animated graphics are not synchronized with the display. Vsync can provide this
synchronization, but at a performance cost.
Graphics cards render frames to an invisible "back buffer" while displaying another (older) frame from the
"front buffer". Once a frame has been completely rendered and is regarded finished, the two buffers are swapped.
The old back buffer becomes the new front buffer and thus becomes visible. The old front buffer becomes the new back buffer
and the next frame will be rendered there. This is done to avoid making half-finished frames visible.
Graphics cards transmit the front buffer image to the monitor top down, line by line. If the buffer swap occurs in the middle
of this process, you'll end up with parts of two (or more) frames visible on the screen at the same time.
E.g. if an application renders frames at 120 fps and the display refresh is 60Hz, the visible on-screen image will be a composite
of two consecutive frames of animation. The top half of the image could come from the first, and the bottom half could come from the
second of the two. And if there has been significant movement between them, the two "half-frames" won't quite fit together.
You may notice a visible "breach" between them. This is referred to as "tearing".
Note that tearing can occur at any ratio between rendering and display frequency. Even if frames are rendered at exactly the display
refresh frequency, buffer flips can still occur in the middle of the screen, and consequently you can still have a visible "breach"
between frames.
Vsync exploits the fact that after transmitting a complete image to the display, top-down, there is
a short period of time when nothing is sent to the monitor, before the transmission process restarts at the top. Vsync forces the
buffer swap to fall into this "dark" moment, in effect eliminating tearing completely.
Because the graphics card must wait for the right moment to swap the buffers, activating vsync can reduce performance.